I’ve made a handful of Halloween amigurumi over the years, and cats always end up being my favorite base — that round head and stubby body just works for costumes. This year I kept picturing a tiny vampire, cape and all, and once I added the fangs I couldn’t stop grinning at it on my desk. So here it is: a small, fast, genuinely cute little Dracula cat.
No fussy techniques here — just single crochet, a shaped cape worked flat, and a bit of hand embroidery for the face. If you’ve made one amigurumi before, you’ve got everything you need for this one.
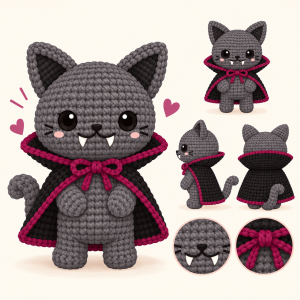
Finished Size
- Height: approximately 5 in / 13 cm (not including ears)
- Body width: approximately 3 in / 7.5 cm at the widest point
Skill Level
Confident Beginner. You’ll need to be comfortable with magic ring, single crochet, increases, decreases, and basic double crochet for the cape. No complex stitches, no bobbles.
Materials
Yarn (DK / Worsted Weight):
- Color A (Charcoal Grey): ~120 yd / 110 m — body, head, arms, ears, tail
- Color B (Black): ~40 yd / 37 m — cape
- Color C (Deep Violet or Wine): ~15 yd / 14 m — cape trim and neck bow
- White embroidery thread: small amount, for fangs and eye highlights
- Black embroidery thread: small amount, for eyes and mouth
Hook: 2.5 mm (or one size smaller than your yarn label suggests — tighter stitches keep the stuffing from peeking through)
Notions:
- Polyester fiberfill
- Yarn needle
- Sewing needle
- Stitch marker
- Scissors
Gauge
Gauge isn’t critical for this project — amigurumi is forgiving that way. What matters more is fabric density: if you can see white fluffs of stuffing through your stitches, drop down a hook size. As a rough reference, single crochet in Color A gives about 5 sts = 1 in / 2.5 cm.
Abbreviations
- ch — chain
- sc — single crochet
- dc — double crochet
- hdc — half double crochet
- inc — increase (2 sc in same stitch)
- dec — invisible decrease (insert hook through front loops of next 2 sts, yarn over, pull through all loops)
- FLO / BLO — front loop only / back loop only
- MR — magic ring
- st(s) — stitch(es)
- FO — fasten off
Worked in continuous rounds (no joining) unless noted. Keep a stitch marker in the first stitch of each round.
Body & Head (worked as one piece, bottom to top)

With Color A:
- Rnd 1: 6 sc in MR (6)
- Rnd 2: inc around (12)
- Rnd 3: (sc 1, inc) x6 (18)
- Rnd 4: (sc 2, inc) x6 (24)
- Rnds 5–10: sc around, 6 rounds even (24)
- Rnd 11: (sc 2, dec) x6 (18)
- Rnd 12: (sc 1, dec) x6 (12)
Stuff the body firmly now, before it narrows further.
- Rnd 13: sc around, working through BLO only (12) — this creates the neck ridge
- Rnd 14: (sc 1, inc) x6 (18)
- Rnd 15: inc around (36)
- Rnds 16–23: sc around, 8 rounds even (36) — this is the head
- Rnd 24: (sc 4, dec) x6 (30)
- Rnd 25: (sc 3, dec) x6 (24)
- Rnd 26: (sc 2, dec) x6 (18)
- Rnd 27: (sc 1, dec) x6 (12)
Add remaining stuffing, packing the head firmly.
FO, thread tail through remaining 6 sts, pull closed, weave in end.
Ears (make 2)
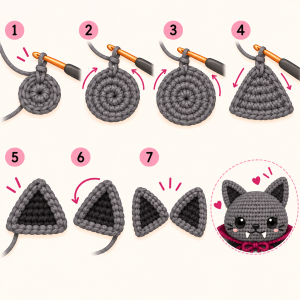
With Color A:
- Rnd 1: 5 sc in MR (5)
- Rnd 2: inc around (10)
- Rnd 3: sc around (10)
- Rnd 4: (sc 1, inc) x5 (15)
FO, leaving a long tail for sewing. Don’t stuff — fold gently before attaching.
Arms (make 2)
With Color A:
- Rnd 1: 5 sc in MR (5)
- Rnds 2–7: sc around, 6 rounds even (5)
Stuff lightly, flatten the opening, and sc across to close. FO, leave a tail for sewing.
Tail
With Color A:
- Rnd 1: 6 sc in MR (6)
- Rnds 2–16: sc around, 15 rounds even (6)
Leave unstuffed or only lightly stuffed so it curls naturally. Flatten and sc across the opening to close. FO, leave a tail for sewing.
The Cape
Worked flat, with a standing collar that frames the neck.

With Color B, ch 16.
Main panel:
- Row 1: dc in 3rd ch from hook and in each ch across (ch-2 does not count as a stitch). Ch 2, turn. (14 dc)
- Row 2: dc in each dc across (ch-2 does not count as a stitch). Ch 2, turn. (14)
- Row 3: dc in each dc across (ch-2 does not count as a stitch). Ch 2, turn. (14)
- Row 4: (1 dc, inc dc) x7. Ch 2, turn. (21)
- Row 5: (2 dc, inc dc) x7. Ch 2, turn. (28)
- Row 6: dc across. FO.
Standing collar:
Join Color B along the top edge of Row 1.
- Row 1: (1 dc, inc dc) x7 (21)
- Row 2: dc across. FO.
Border the whole cape — sides, bottom, and collar — with one round of sc in Color C, working an extra stitch at each corner to keep the edge from curling.
Assembly
- Ears attach to the top of the head, roughly 4 rounds down from the crown, angled slightly outward.
- Arms sew onto either side of the body, near the widest point of the torso.
- Tail attaches to the lower back.
- Eyes: embroider two almond shapes in black thread about 5–6 rounds down from the top of the head, spaced 4–5 sts apart. Add a small white highlight stitch in one corner of each.
- Fangs: stitch two small downward V’s in white thread just below where the mouth sits — this is what sells the vampire look before the cape even goes on.
- Mouth: a simple curved line in black thread beneath the fangs.
- Cape: drape over the shoulders like a cloak, covering the arms, and tack lightly at the shoulders so it moves naturally.
- Collar bow: cut a short length of Color C, tie around the neck at the color-change seam, and finish with a small bow at the front.
Weave in your ends, give the whole thing a gentle squeeze to settle the stuffing, and there he is — fangs, cape, and all.
A Few Ways to Switch It Up
Want a softer, less spooky version? Swap the black cape for deep plum or burgundy — same construction, much gentler vibe.
No safety eyes on hand? Embroidered eyes (as written) work just as well and keep the whole thing kid-safe.
Turning it into an ornament? Skip the legs’ worth of stuffing weight by leaving the tail unstuffed, and sew a small loop of Color C to the top of the head before attaching the ears.
Making a coven? The cape and collar are the whole trick here — repeat the same cat in different main colors (black, white, orange) and just vary the cape trim color each time.
If you make one, I’d genuinely love to see it — every version turns out with its own little personality. Happy hooking, and don’t let the cape intimidate you, it’s really just two rectangles and some trim.