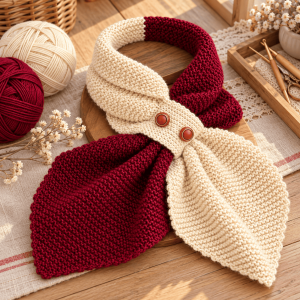
I’ll be honest: I saw this scarf and assumed it was knitted. The ridged, bumpy texture screams garter stitch. But I’m a hooker through and through, so I spent two weekends figuring out how to get that look with a crochet hook.
My first try was in half double crochet. It looked lovely, but it was floppy and had no ridges. My second try was single crochet in the back loop only, and that was it. You get those chunky horizontal ridges, and the fabric still has enough drape to sit nicely around your neck.
The result is a two-tone pull-through scarf. Half is burgundy and half is cream, with pointed ends that tuck through a small button collar. There’s no seaming in the middle and no fancy stitches. It’s one long strip with increases and decreases, plus a little band to hold it all together.
Finished Size
- Total length: approx. 40 in / 100 cm
- Widest point of each end: approx. 7.5 in / 19 cm
- Neck strip width: approx. 2.75 in / 7 cm
- Button collar: approx. 2.25 x 9 in / 6 x 23 cm
Skill Level
Beginner-friendly. If you can single crochet, increase, and decrease, you can make this. The only slightly new thing is working in the back loop only.
Materials
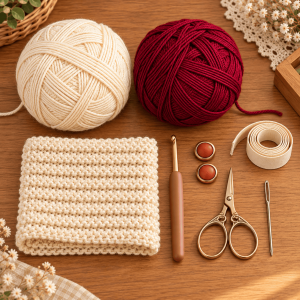
- Yarn (worsted weight / US 4):
- Color A, Burgundy (wine red): ~120 yd / 110 m
- Color B, Cream (ecru): ~150 yd / 137 m, including the collar
- Hook: US H-8 / 5.0 mm
- Notions:
- 2 buttons, terracotta or burnt-orange with a gold rim, 18–20 mm
- Yarn needle
- Sewing needle and matching thread
- Scissors, stitch marker, measuring tape
Note: I like a soft merino blend because it shows the ridges clearly. Smooth cotton blends work too, but they’ll hang a little heavier.
Gauge
- In sc BLO: 14 sts x 16 rows = 4 in / 10 cm.
- Please do swatch this one. BLO fabric is denser than regular single crochet, so a tight hook gives you a stiff, board-like scarf. If your swatch feels stiff, go up a hook size. It should bend easily when you drape it over your hand.
Abbreviations
- ch: chain
- sc: single crochet
- BLO: back loop only
- inc: 2 sc in the same stitch
- sc2tog: single crochet 2 together (pull up a loop in each of the next 2 sts, then yarn over and pull through all 3 loops)
- st(s): stitch(es)
- RS: right side
Pattern Instructions
Special note: Work every stitch (including increases and decreases) in the BLO. The ch 1 at the start of each row does not count as a stitch.

Part 1: Burgundy Pointed End
With Color A, ch 3.
- Row 1: Sc in 2nd ch from hook and in the last ch. (2 sts)
- Row 2 (Inc): Ch 1, turn. Inc in the first st, inc in the last st. (4 sts)
- Rows 3–24: We will alternate increase rows and even rows to reach exactly 26 stitches.
- Row 3 (Even): Ch 1, turn. Sc across. (4 sts)
- Row 4 (Inc): Ch 1, turn. Inc in the first st, sc across to the last st, inc in the last st. (6 sts)
- Repeat Row 3 and Row 4 logic through Row 24. (You will complete 11 increase rows and 11 even rows in total).
- Row 24 (Even): Ch 1, turn. Sc across. (26 sts)
- Rows 25–32 (Even): Ch 1, turn. Sc across. (26 sts)
- Rows 33–40 (Dec): We will now decrease on every row to shape the taper before the neck strip.
- Row 33: Ch 1, turn. Sc2tog, sc across to the last 2 sts, sc2tog. (24 sts)
- Repeat Row 33 logic for every row through Row 40. (You will decrease 2 sts per row for 8 rows).
- Row 40: Ch 1, turn. Sc2tog, sc across to the last 2 sts, sc2tog. (10 sts)
Tip: Put a stitch marker in the last stitch of every 10th row. Counting ridges after the fact is a nightmare, and I’ve lost count more than once.
Part 2: The Two-Tone Neck Strip
Keep going with Color A.
- Rows 41–80: Ch 1, turn. Sc across. (10 sts)
- On the last stitch of Row 80, pull Color B through the last two loops to change color. Turn, and drop Color A. Leave a 6 in tail to weave in later.
- Rows 81–120: With Color B, ch 1, turn. Sc across. (10 sts)
Tip: Before changing color, measure the strip. Each half should be about 10 in / 25 cm. If you want a snugger scarf, make the strip shorter. If you want a looser one, add rows, always in multiples of two so that the color change stays centered.
Part 3: Cream Pointed End
- Rows 121–128 (Inc): We will widen the scarf by increasing on every row.
- Row 121: Ch 1, turn. Inc in the first st, sc across to the last st, inc in the last st. (12 sts)
- Repeat Row 121 logic for every row through Row 128. (You will increase 2 sts per row for 8 rows).
- Row 128: Ch 1, turn. Inc in the first st, sc across to the last st, inc in the last st. (26 sts)
- Rows 129–136 (Even): Ch 1, turn. Sc across. (26 sts)
- Rows 137–160: We will alternate decrease rows and even rows to shape the final point.
- Row 137 (Dec): Ch 1, turn. Sc2tog, sc across to the last 2 sts, sc2tog. (24 sts)
- Row 138 (Even): Ch 1, turn. Sc across. (24 sts)
- Repeat Row 137 and Row 138 logic through Row 160. (You will complete 12 decrease rows and 12 even rows in total).
- Row 160 (Even): Ch 1, turn. Sc across. (2 sts)
- Final step: Ch 1, turn. Sc2tog. (1 st) Fasten off and weave in the tail.
Part 4: The Button Collar
With Color B, ch 9.
- Row 1: Sc in 2nd ch from hook and across. (8 sts)
- Rows 2–3: Ch 1, turn. Sc across. (8 sts)
- Row 4 (Buttonhole): Ch 1, turn. Sc 3, ch 2, skip 2 sts, sc 3. (6 sts, 1 ch-space)
- Row 5: Ch 1, turn. Sc 3, 2 sc in the ch-2 space, sc 3. (8 sts)
- Rows 6–10: Ch 1, turn. Sc across. (8 sts)
- Row 11 (Second Buttonhole): Repeat Row 4.
- Row 12: Repeat Row 5. (8 sts)
- Rows 13–36: Ch 1, turn. Sc across. (8 sts)
- Fasten off and weave in the ends.
Finishing & Assembly
- Block it. Weave in all ends, then wet-block the scarf and the collar. Pin the ends so the points stay crisp. This opens up the ridges and makes the fabric look so much more like garter stitch. Don’t skip this step!
- Position the buttons. Wrap the collar around the two strands of the scarf, overlapping the ends by about 2 in / 5 cm. Use pins to mark where the buttonholes land on the underside.
- Sew the buttons on. Stitch them securely with sewing thread. I sew each button through twice for extra strength, because they take a lot of tugging.
How to wear it
Fold the scarf at the color change and place that fold behind your neck. Bring both pointed ends to the front. Slip the collar over them about 4 in / 10 cm below your chin and button it. Then pull the ends out and fan them so the two colors show.
What I Learned (So You Don’t Have To)

- My first swatch was a brick. I used a 4.0 mm hook and the fabric felt like cardboard. At 5.0 mm it drapes properly. When in doubt, go up a size.
- Curling is normal. The edges curl before blocking. Don’t panic and don’t add a border. Blocking fixes it completely.
- Count your rows. I once made the cream half 6 rows too short, and the neck loop ended up lopsided. The stitch markers on every 10th row saved me after that.
- Wind both yarns before you start. You’ll switch colors only once, but having the cream ready makes the color change much smoother.
Ways to Switch It Up
- Different colors: Forest green with oatmeal, or navy with grey, looks just as classy. Keep one dark and one light color for the strongest contrast.
- Kid size: Use a 4.0 mm hook, DK yarn, and cut the strip to 6 in / 15 cm per color.
- Skip the collar: The scarf also works as a simple long keyhole scarf. Just make it a little wider if you want more coverage.
I’d love to see yours. Share a photo in the comments, or tag me if you post it. Happy hooking!