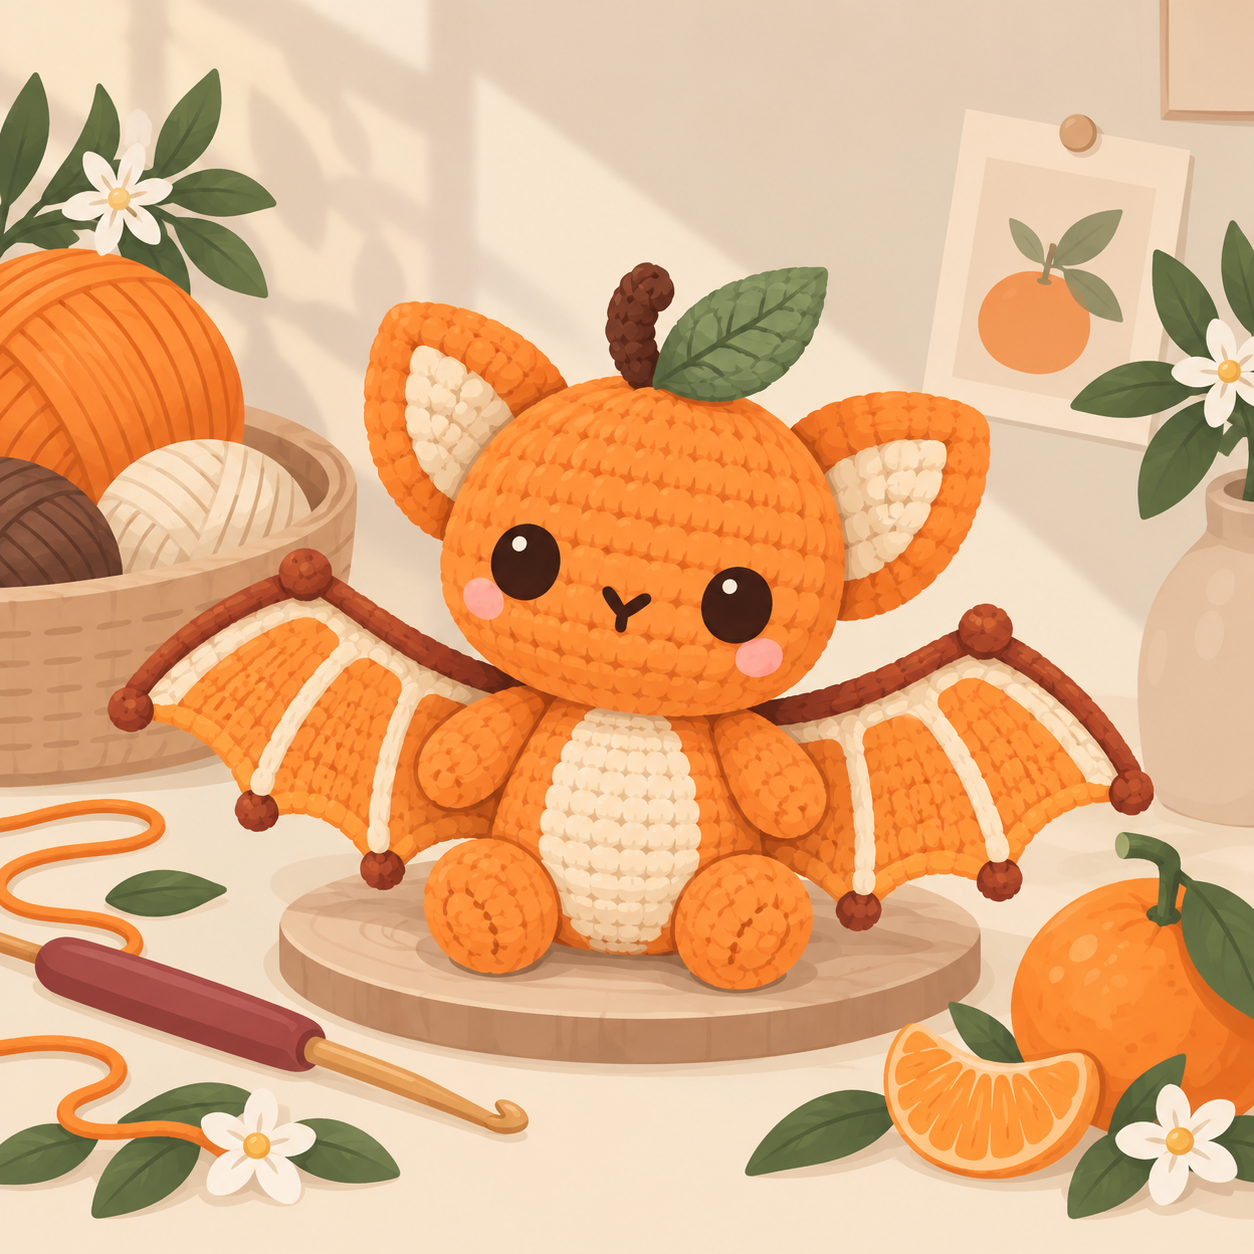
I kept seeing gorgeous citrus-themed bats all over my Pinterest feed this fall, and every single one used bobble stitch for the peel texture and hand embroidery on the wings. Beautiful results, no argument there — but also a solid weekend project, and honestly, bobble stitch is not my favorite thing to do for forty rounds straight.
So I made my own version. No bobbles. No embroidery unless you feel like it. The “peel” texture comes from a handful of French knots you add right at the end, and the wing stripes are just built in as you go by switching colors — so you get that orange-slice look without ever picking up a needle for detail work.
It also turned out small. Smaller than I planned, actually — I sized it down partway through because I liked how it looked as something you could clip to a bag or hang off a keyring, rather than another thing sitting on a shelf collecting dust. Want it bigger? Scale up the yarn weight and hook — notes on that at the bottom.
Finished Size
- Height: approximately 5.5 in / 14 cm
- Wingspan: approximately 9 in / 23 cm
- Body only (no wings): approximately 4 in / 10 cm tall
Skill Level
Confident Beginner. You should be comfortable with magic ring, single crochet, half-double crochet, and basic increases/decreases. No bobble stitch, no surface embroidery required.
Materials
Yarn (Worsted Weight / US 4):
- Color A (Mandarin Orange): ~100 yd / 90 m — main color for body, head, ears, arms, legs
- Color B (Cream): ~50 yd / 45 m — wing stripes
- Color C (Charcoal or Dark Brown): ~10 yd / 9 m — wing outline and French knot texture
- Color D (Leaf Green): ~10 yd / 9 m — single head leaf
Hook: US G-6 / 4.0 mm
Notions:
- 2 safety eyes, 9–10 mm
- Small scrap of black yarn or floss for the nose
- Polyester fiberfill
- Yarn needle
- 2–3 stitch markers
- Optional: keyring or ribbon loop, if turning this into a bag charm
Gauge
With Color A, single crochet in continuous rounds: 5 sts = 1 in / 2.5 cm. Don’t stress too much about matching this exactly — amigurumi is forgiving that way. What actually matters is that your fabric is tight enough that the stuffing doesn’t show through the gaps. If you can see little white tufts poking out as you go, size down your hook.
Abbreviations
- ch — chain
- sc — single crochet
- hdc — half double crochet
- inc — increase (2 sc in same stitch)
- dec — invisible decrease (insert hook through front loop of next 2 sts, yarn over, pull through all 3 loops)
- MR — magic ring
- st(s) — stitch(es)
- FO — fasten off
All rounds are worked continuously (no joining) unless noted. Use a stitch marker in the first stitch of each round and move it up as you go.
Head & Body (worked as one piece, top to bottom)
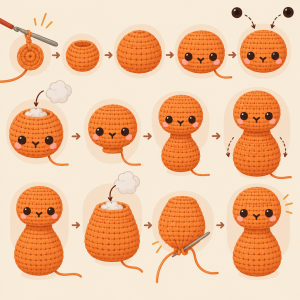
With Color A:
- Rnd 1: 6 sc in MR (6)
- Rnd 2: inc around (12)
- Rnd 3: (sc 1, inc) x6 (18)
- Rnd 4: (sc 2, inc) x6 (24)
- Rnd 5: (sc 3, inc) x6 (30)
- Rnd 6: (sc 4, inc) x6 (36)
- Rnds 7–11: sc around, 5 rounds even (36)
Insert safety eyes now, between Rounds 8 and 9, about 8–9 stitches apart. Stitch a small “V” nose in Color C just below and between the eyes.
- Rnd 12: (sc 4, dec) x6 (30)
- Rnd 13: (sc 3, dec) x6 (24)
- Rnd 14: (sc 2, dec) x6 (18)
Stuff the head firmly before continuing.
- Rnd 15: (sc 1, dec) x6 (12)
- Rnd 16: sc around (12) — this is the neck
Begin body:
- Rnd 17: (sc 1, inc) x6 (18)
- Rnd 18: (sc 2, inc) x6 (24)
- Rnd 19: (sc 3, inc) x6 (30)
- Rnds 20–24: sc around, 5 rounds even (30)
Stuff the body, adding fiberfill as you go so it stays evenly firm.
- Rnd 25: (sc 3, dec) x6 (24)
- Rnd 26: (sc 2, dec) x6 (18)
- Rnd 27: (sc 1, dec) x6 (12)
Add final stuffing — firm but not overstuffed.
FO, leaving a 6 in tail. Thread through remaining 6 sts, pull closed, weave in end.
Ears (make 2)
With Color A:
- Rnd 1: 6 sc in MR (6)
- Rnd 2: (sc 1, inc) x3 (9)
- Rnd 3: (sc 2, inc) x3 (12)
- Rnds 4–5: sc around, 2 rounds even (12)
Do not stuff. Flatten and sl st the opening closed. Leave a long tail for sewing.
Arms (make 2)
With Color A:
- Rnd 1: 6 sc in MR (6)
- Rnds 2–5: sc around, 4 rounds even (6)
FO, leaving a long tail. No stuffing needed — arms stay soft and thin.
Legs (make 2)
With Color A:
- Rnd 1: 6 sc in MR (6)
- Rnd 2: inc around (12)
- Rnd 3: sc around (12)
- Rnd 4: dec around (6)
FO, leaving a long tail. Stuff lightly.
Wings (make 2)
Worked flat in rows using hdc, with color changes built in to create citrus-segment stripes — no embroidery needed.
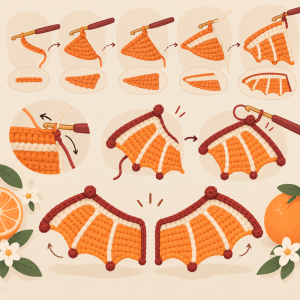
With Color A, ch 4.
- Row 1 (RS): 4 hdc in 4th ch from hook. Ch 2, turn. (4 sts)
- Row 2: 2 hdc in first st, hdc across, 2 hdc in last st. Ch 2, turn. (6 sts) — switch to Color B
- Row 3: 2 hdc in first st, hdc across, 2 hdc in last st. Ch 2, turn. (8 sts)
- Row 4: repeat Row 3 shaping. (10 sts) — switch to Color A
- Row 5: repeat Row 3 shaping. (12 sts)
- Row 6: repeat Row 3 shaping. (14 sts) — switch to Color B
- Row 7: repeat Row 3 shaping. (16 sts)
- Row 8: repeat Row 3 shaping. (18 sts) — switch to Color A
- Row 9: hdc across evenly, no increase. Ch 1, turn. (18 sts)
Drop working color. Join Color C and work 1 round of sc evenly around the entire wing edge to outline it. FO.
Mine curled a little at first — if yours does too, don’t panic. A light steam press (hover the iron, don’t touch the yarn directly) flattens it right out. It should end up lying flat, roughly 4 in / 10 cm across.
For the texture, grab Color C and just dot 4–5 French knots near the outer edge of each wing, kind of scattered, like juice sacs. Totally optional, but I think it’s what makes these feel finished rather than just… striped.
Leaf (make 1)
With Color D, ch 5.
- Row 1 (RS): sc in 2nd ch from hook, sc in next 2 chs, 3 sc in last ch, sc in next 2 chs along the other side. Ch 1, turn.
FO, leaving a long tail. Pinch the base gently to give it a natural curve.
Assembly
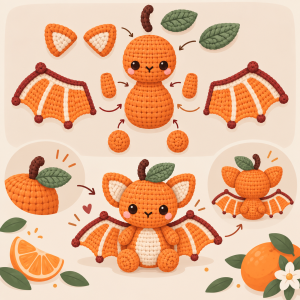
- Ears go on the upper sides of the head, angled slightly outward. Sew them on securely — they take a lot of handling once this becomes someone’s keychain.
- Leaf sews onto the top center of the head, right between the ears.
- Legs attach to the bottom front of the body, pointing a bit forward, like your bat is mid-landing.
- Arms go on the upper sides of the body just below the neck, angled down.
- Wings take the most patience. Pin the straight edge along the side of the body — roughly from the neck down to the widest part — and sew all the way along it before you commit. This seam does all the work of holding the wings up, so take your time here. I ripped mine out twice before I got the angle right.
Weave in your ends, give the whole thing a gentle squeeze to settle the stuffing, and step back and look at it. You made a bat. Out of yarn. That’s pretty great.
A Few Ways to Switch It Up
Want it as a keychain? Skip stuffing the legs, and sew a small ribbon loop or keyring to the top of the head before you attach the leaf.
Not feeling orange? Swap Color A for pale yellow and you’ve got a lemon. Soft pink gets you grapefruit. Everything else stays exactly the same — that’s the nice part about this construction.
Want it tinier? Fingering weight yarn and a 3.0 mm hook, same stitch counts, gets you down to about 3.5 in. Fair warning, the French knots get fiddly at that size.
If you make one of these, seriously, send me a photo. I still get excited every time someone shares their version — everyone’s turns out just a little different, and I love seeing that. Drop it in the comments, or tag me if you post it. Happy hooking, and don’t let the wings scare you off — they’re easier than they look.