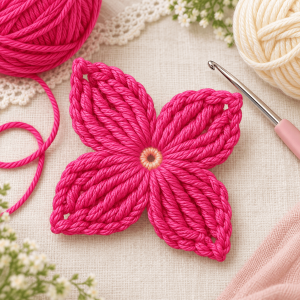
The first time I saw a flower like this, I assumed it was made with a hundred tiny stitches. Those long, silky strands fanning out from a little peach center looked far too intricate for a quick project. Then I picked up my hook and realized there is one trick behind the whole thing, and it has nothing to do with fancy stitches.
Every petal is a bundle of long loops pulled up from the center and closed all at once. That’s it. No rows, no turning, no counting forty stitches per petal.
I’ve made about a dozen of these now, and my first two looked nothing like the photo. One was floppy, one was lumpy. Everything below is what I figured out the hard way, so yours should come out right on the first try.
Finished Size
- Flower diameter: approximately 4 in / 10 cm
- Each petal length: approximately 1.75 in / 4.5 cm
- Center: approximately 0.5 in / 1.2 cm
Skill Level
Beginner-friendly. You only need magic ring, single crochet, chain, and slip stitch. The loop technique is new for most people, but it’s repetition rather than difficulty. Expect to rip back once. I did.
Materials
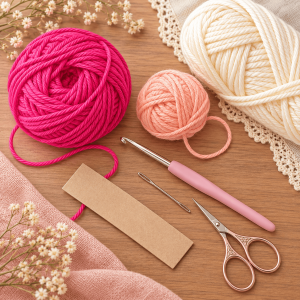
Yarn (DK or light worsted, mercerized cotton):
- Color A (Hot Pink / Fuchsia): about 15 yd / 14 m for the petals
- Color B (Peach or Apricot): about 3 yd / 3 m for the center
Hook: 3.0 mm (US D-3). If your petals feel loose, drop to 2.5 mm.
Notions:
- Yarn needle
- A strip of cardboard exactly 1.25 in / 3 cm wide (my loop guide, explained below)
- Fabric stiffener or spray starch (optional)
- Pin-back, hair clip, or felt circle if you want to turn it into an accessory
A note on yarn: I tried this in acrylic first, and the loops fluffed up and hid the pretty strand definition. Mercerized cotton has a glossy twist, so every loop stays crisp and shiny. That is why the petals in the photo look so smooth.
Gauge
Gauge doesn’t matter much here, but loop height does. Every loop should be the same length, around 1.25 in / 3 cm. Uneven loops are the number one reason these flowers look messy.
Abbreviations
- MR: magic ring
- ch: chain
- sc: single crochet
- sl st: slip stitch
- st(s): stitch(es)
- FO: fasten off
- Loop: insert hook into the stitch, yarn over, pull up a loop to the height of your guide, and leave it on the hook
How the Loop Technique Works
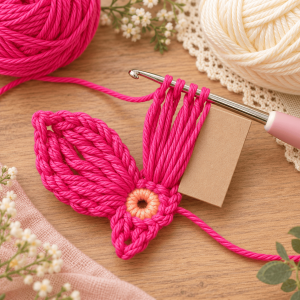
Skim this before you start, because it’s the whole pattern.
- Insert your hook into the stitch.
- Yarn over and pull up a long loop, about 1.25 in tall.
- Keep that loop on the hook.
- Repeat until you have the number of loops the pattern asks for.
- Yarn over and pull through all loops at once.
- Chain 1 tightly to lock the petal.
My cardboard trick: I cut a strip of cardboard 1.25 in wide and hold it against my work as I pull each loop up. When the loop reaches the edge of the card, I stop. After a few loops your hand memorizes the height, and you can put the card away. This is the best habit I picked up for this pattern. Without it, my loops ranged from short to extremely long, and the petals looked ragged.
Center (Color B)
With Color B:
- Rnd 1: 8 sc in MR (8)
- Join with a sl st to the first sc. FO, leaving a 6 in tail.
Don’t close the ring completely. In the photo you can see a tiny hole in the middle. Pull the tail just until the hole is about the size of a pea, then weave the tail on the back. A fully closed center looks flat and unfinished, while a small open center gives you that sweet bullseye effect.
Petals (Color A)
Hold the center with the right side facing you. You will make 4 petals, and each one uses 2 stitches of the center ring.
Petal 1:
- Place a slip knot of Color A on your hook. This counts as your first loop.
- Insert the hook into stitch 1 of the ring and pull up a long loop. Repeat 3 more times in the same stitch (4 loops from stitch 1).
- Move to stitch 2 and pull up 4 loops in the same way.
- You should now have 9 loops on your hook (the slip knot plus 8 pulled-up loops).
- Yarn over and pull through all 9 loops.
- Ch 1 tightly to lock.
Petals 2–4:
- Skip nothing. Your next petal starts in the very next stitch.
- Repeat the same steps: 4 loops in the next stitch, 4 loops in the stitch after it, yarn over, pull through all, ch 1.
- The chain 1 from the previous petal serves as your base loop, so you will again have 9 loops on the hook.
After Petal 4, sl st into the locking chain of Petal 1. FO and weave in your end.
The 9-loop moment: this is where most people panic. Nine loops on a 3.0 mm hook feels crowded. Let the loops sit on the thick shaft of the hook, not near the tip, and the final pull-through gets easy. Pull slowly, wiggle the hook, and don’t yank. I snapped a cotton strand once by rushing.
Shaping the Petals
Right after finishing, the loops will look tangled. Don’t worry.
- Lay the flower flat on a table.
- Use your fingers to comb each petal’s loops into a neat fan, narrow at the center and wider at the tip.
- Make sure no loop is twisted. Twisted loops catch light differently and look dull.
- Smooth each petal outward from the center.
This step takes about two minutes and changes the whole look. In the photo, every strand lies parallel and glossy, which comes from this combing and not from any special stitch.
Finishing
Lightly mist the flower with spray starch or fabric stiffener and shape it again. Let it dry flat for a few hours. Cotton loops have a tendency to relax over time, and the starch helps them keep their fan shape. I skipped this on my second flower and by the next day the petals had drooped.
If you want to hang or wear it:
- Hair clip: sew a flat clip to the back, with a felt circle between the clip and the yarn so stitches don’t show.
- Brooch: sew on a pin-back.
- Garland: make a dozen in different colors and join them with a simple chain.
Common Mistakes (and How I Fixed Them)
My loops are different lengths.
Use the cardboard guide until your hand learns the height. This fixes it almost every time.
The petals look bulky, not elegant.
Your hook is probably too big for the yarn. Drop to a 2.5 mm hook, or use thinner cotton.
The flower won’t lie flat.
You likely locked the petals too loosely. Make the ch 1 after each petal snug. If it still curls, steam it lightly, holding the iron above the yarn without touching.
The center looks too big.
Use a smaller yarn weight for the center, or work only 6 sc in the ring and make 3 petals.
A Few Ways to Switch It Up
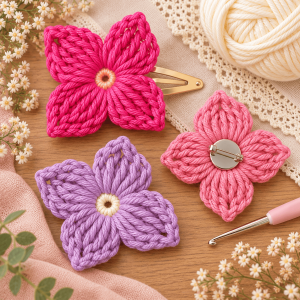
Different colors. Lavender petals with a cream center look lovely, and so do coral petals with a yellow center. Keep the contrast between petal and center for the best effect.
Five petals. Work 10 sc in the center ring and make each petal from 2 stitches. You get a rounder, more daisy-like bloom.
Mini version. Use fingering cotton, a 2.0 mm hook, and a 0.75 in loop guide. These are cute as earrings, but fiddly. Cut your guide from a business card.
Bigger version. Use worsted cotton and a 4.0 mm hook with a 2 in loop guide. The flower can reach 6 in across and makes a gorgeous coaster.
Final Thoughts
Looking at the finished flower, it’s hard to believe how easy it was. The effect comes from consistency: same loop height, same number of loops, same gentle fanning at the end. Once you get into a rhythm, you can make one while watching half an episode of your favorite show.
If you make one, I would love to see it. Share a photo in the comments or tag me when you post. Everyone’s flower comes out a little different, and that’s the fun part. Happy hooking!