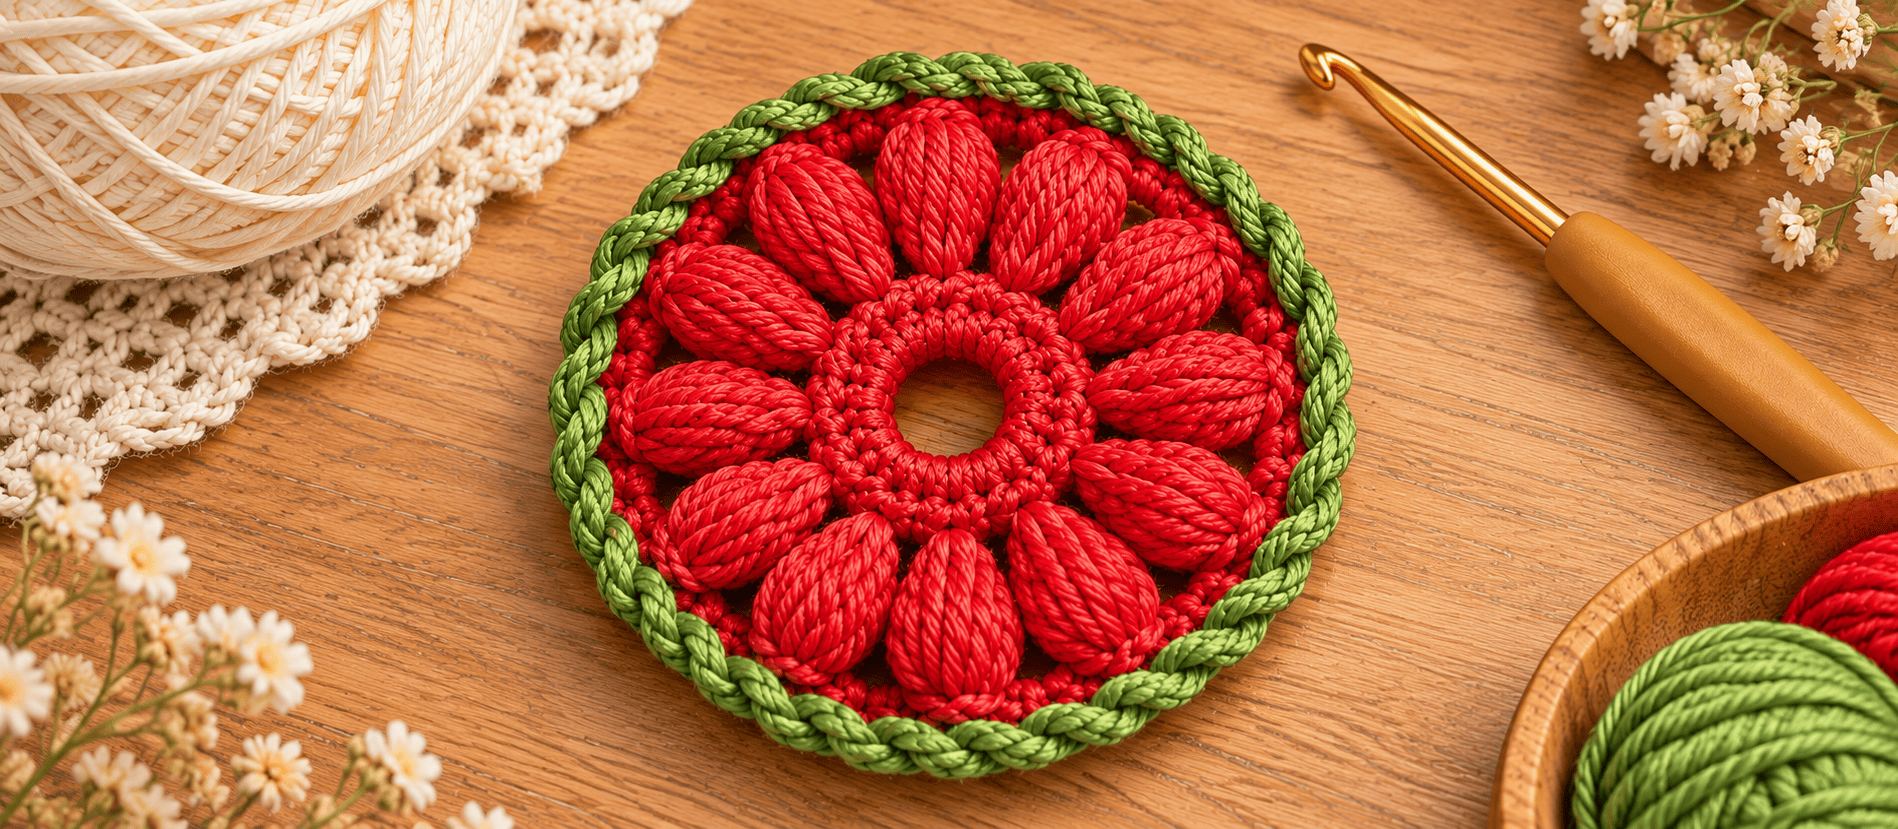
Last winter I spent an entire weekend chasing a flower I’d seen in a short video: fat, glossy spokes radiating from a tiny hole, edged in a bright green rope. Every tutorial I found did it with bobble stitches or with petals sewn on afterwards. Both felt like way too much work for a motif that fits in your palm.
So I tried it with plain puff stitches, worked in a single round, with the loops pulled up long enough to lie flat like petals. The first attempt looked like a squashed tomato. The third one looked like the picture in my head. Below is everything I learned, so you can skip straight to the good one.
The result is a small, domed red flower with an open center and a twisted green border. It works up in about 40 minutes, and it’s the kind of motif you’ll end up making six of “just to use up the yarn.”

Finished Size
- Diameter: about 2–2.5 in / 5–6 cm (depends on your yarn)
- Center hole: about ½ in / 1 cm
- Height: slightly domed, about ¼ in / 6 mm
Skill Level
Easy / confident beginner. You need to know chain, slip stitch, single crochet, increases and how to make a puff stitch (explained below). The reverse single crochet edge looks fancy, but it’s just single crochet worked backwards.
Materials

- Color A (Red): about 20 yd / 18 m of mercerized cotton, DK or 4-ply weight
- Color B (Green): about 8 yd / 7 m of the same yarn
- Hook: 3.0 mm (US C-2/D-3). Go one size down from the label if your stitches look loose.
- Yarn needle
- Scissors
- Optional: pin or ornament cord for finishing
My yarn tip: I use mercerized cotton for this one. It has a silky sheen, and the puff stitches keep their shape. When I tried soft acrylic, the puffs flopped sideways and the spokes lost their definition.
Gauge
Not critical for a motif. What matters is that your fabric is firm enough that the puffs stand up instead of collapsing. If they look floppy, drop a hook size.
Abbreviations
- ch – chain
- sl st – slip stitch
- sc – single crochet
- inc – 2 sc in the same stitch
- puff – puff stitch (see below)
- rev sc – reverse single crochet (crab stitch)
- st(s) – stitch(es)
How to make the puff stitch: Yarn over, insert hook into the stitch, yarn over and pull up a long loop, about ⅜ in / 1 cm. Repeat this 3 more times in the same stitch (9 loops on the hook). Yarn over and pull through all 9 loops, then ch 1 to lock the puff. The locking chain does not count as a stitch.
My long-loop trick: Loop length is what makes or breaks this flower. Use the thickness of your hook handle as a guide and pull each loop up to the same height. Uneven loops give you lopsided spokes.
Pattern

All rounds are joined with a sl st to the first stitch and worked with the right side facing. The starting ch 1 does not count as a stitch.
Center Ring (Red)
- Ring: ch 5, sl st in the first ch to form a ring.
- Rnd 1: ch 1, 12 sc into the ring, sl st to join. (12)
- Rnd 2: ch 1, inc in each st around, sl st to join. (24)
This builds the raised little donut around the hole. Don’t skip Rnd 2 or try to merge it with the next round; the donut is what frames the open center.
- Rnd 3: ch 1, (sc in next st, inc in next st) x12, sl st to join. (36)
Puff Spokes (Red)
- Rnd 4: ch 1, (puff in next st, sc in each of next 2 sts) x12, sl st to join. (36)
This round gives you the 12 spokes. Pull every loop to the same length, and don’t pull the locking chain tight. A relaxed chain lets the puff lie flat and point outward.
- Rnd 5: ch 1, (sc in next st, inc in next st) x18, sl st to join. (54)
Work each sc into the top of the puff, under the two strands of the locking chain. Working here flattens the spokes against the surface, and the increases make the flower open out instead of cupping.
- Rnd 6: ch 1, (sc in next 8 sts, inc in next st) x6, sl st to join. (60)
Change color: On the last sl st of this round, pull a loop of green yarn through the loop on your hook. Cut the red, leaving a 4 in tail.
Rope Edge (Green)
- Rnd 7: ch 1, do not turn. Work reverse single crochet in each st around (60), sl st to the first st. Fasten off, leaving a 6 in tail.
How to reverse sc: Instead of working right to left, insert your hook into the next stitch to the right (clockwise). Yarn over, pull the loop out and under, yarn over, and pull through both loops on the hook. Repeat around. The stitches twist into that rope-like edge.
My honest note: The first few reverse sc feel awkward, like writing with the wrong hand. By the fifth or sixth stitch your wrist figures it out. If you really don’t want to learn it today, plain sc in the green gives a flatter, softer edge. It’s still pretty, just less like the rope look in the photo.
Finishing
- Weave in ends. Thread the green tail through the back of the border, then do the same with the red tails near the center. Do the center ones first, so you don’t pull the ring wider.
- Shape the spokes. Turn the motif over and gently press from the back with your thumb. This pushes the puffs up and makes them rounder.
- Light blocking. Pin it flat, steam it without touching the yarn, and let it dry. Cotton holds the shape well. Skip this step if you like the extra dome.
What to Make With It

- Christmas ornament: thread a loop of cord through the center hole. Red and green are already the right colors.
- Brooch or hair clip: sew a pin or clip to the back.
- Gift topper: tie it onto a wrapped present with ribbon.
- Garland or blanket: make 20 to 30 and join them.
Variations
- Different colors: pink with cream edging, yellow with brown, or navy with white all look lovely. Keep high contrast between the flower and the edge so the rope stands out.
- Bigger flower: use 8-ply cotton and a 4.0 mm hook with the same stitch counts, or add one more round of puffs to a larger base.
- No center hole: work Rnd 1 as 6 sc in a magic ring, but then you lose the donut effect.
Troubleshooting (What Went Wrong For Me)
- Puffs look squashed: your loops were too short. Pull them up higher.
- Flower curls up like a bowl: you missed an increase in Rnd 5 or 6. Count your stitches.
- Edge looks messy: you were reverse single crocheting too tight. Relax your tension a little.
- Flower ripples: hook too big. Go down half a size.
Make one, then make another. Each one comes out a tiny bit different, and honestly that’s what I like most about them. If you finish one, I’d love to see it. Drop a photo in the comments or tag me. Happy hooking!