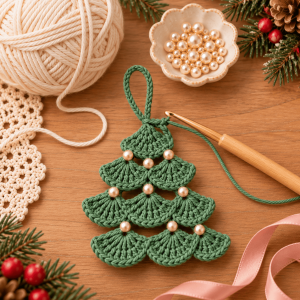
Last November I crocheted twelve little fan-stitch trees for a gift swap. Eleven of them came out as floppy little lampshades. The twelfth stood up straight, and the only thing I had changed was what I did after the last stitch, not the stitching itself. That’s the tree this pattern is.
The other thing that bugged me was color. Nearly every fan tree I found online was green, worked in thick yarn, and looked more like a coaster than an ornament. So I went in a different direction: dusty blue “frosted spruce,” a warm taupe trunk, a blush satin bow, and champagne pearls. The shape stays the classic tiered-scallop tree. The mood is completely different.
One more thing I love about this design is that the chain-arch rows double as a bead map. Every bead goes exactly on a stitch you’ve already made, so you never have to eyeball the placement.
Finished Size

- Height (with hanging loop): approx. 5.5 in / 14 cm
- Width at the bottom tier: approx. 4.5 in / 11.5 cm
- Trunk: approx. 0.5 in / 1.3 cm
Skill Level
Confident Beginner. You should be comfortable with chain, slip stitch, single crochet, double crochet, and working into chain spaces. The whole tree is flat and worked in rows. There are no parts to sew together except the beads.
Materials

Yarn (Sport Weight / 4-ply mercerized cotton):
- Color A (Dusty Blue): ~25 yd / 23 m for the tree and hanging loop
- Color B (Warm Taupe): ~5 yd / 4.5 m for the trunk
Hook: 2.0 mm (US B-1)
Notions:
- 15 pearl beads, 4 mm (champagne or ivory)
- 1 pearl bead, 6 mm, for the bow
- Satin ribbon, 1/4 in / 6 mm wide, 10 in / 25 cm long (blush pink)
- Beading needle and matching thread
- Yarn needle
- Fabric stiffener, or white craft glue mixed 1:1 with water
- Foam board and pins
I tried DK cotton on a 3.0 mm hook first, and the tree came out nearly 7 in tall and looked chunky. Stay with sport weight for a true ornament size. Choose cotton too. Acrylic barely takes stiffener, and stiffener is what makes this tree stand up.
Gauge
Gauge isn’t critical here, but Row 3 (the first two fans) should measure about 1.5 in / 4 cm wide. If yours is much bigger, drop a hook size. A tight, firm fabric holds its shape far better.
Abbreviations
- ch — chain
- sl st — slip stitch
- sc — single crochet
- dc — double crochet
- st(s) — stitch(es)
- sp — space
- FO — fasten off
- Fan — 5 dc worked in the same stitch or space
The tree is worked top to bottom. Every row ends with a turn. Fan rows alternate with arch rows: a fan row, then an arch row that adds one more arch, then a fan row that puts a fan in every arch.
Hanging Loop
With Color A, ch 15. Join with a sl st to the first ch to form a loop. Ch 1, work 18 sc over the chain loop so it’s fully covered. Join with a sl st to the first sc. Don’t fasten off.
Tree Body
- Row 1 (Fan): Ch 3 (counts as first dc), 4 dc in the same st as the join. (5 dc) Turn.
- Row 2 (Arch): Ch 1, sc in first st, ch 4, sc in the 3rd dc, ch 4, sc in last st. (3 sc, 2 arches) Turn.
- Row 3 (Fan): Ch 3, 4 dc in first arch, 5 dc in next arch. (2 fans) Turn.
- Row 4 (Arch): Ch 1, sc in first st, ch 4, sc in the 3rd dc of the first fan, ch 5, sc in the 3rd dc of the second fan, ch 4, sc in last st. (4 sc, 3 arches) Turn.
- Row 5 (Fan): Ch 3, 4 dc in first arch, 5 dc in each of the next 2 arches. (3 fans) Turn.
- Row 6 (Arch): Ch 1, sc in first st, ch 4, sc in the 3rd dc of the first fan, *ch 5, sc in the 3rd dc of the next fan; repeat from * once more, ch 4, sc in last st. (5 sc, 4 arches) Turn.
- Row 7 (Fan): Ch 3, 4 dc in first arch, 5 dc in each remaining arch. (4 fans) Turn.
- Row 8 (Arch): Same as Row 6, but repeat the ch 5 section 3 times. (6 sc, 5 arches) Turn.
- Row 9 (Fan): Same as Row 7. (5 fans) Turn.
- Row 10 (Arch): Same as Row 6, but repeat the ch 5 section 4 times. (7 sc, 6 arches) Turn.
- Row 11 (Fan): Same as Row 7. (6 fans, 30 dc) FO.
The key to every arch row: the first and last st of the row are the first and last dc of the fan row (the last one is the top of the beginning ch 3). In between, you only anchor on the 3rd dc (center) of each fan. Edge arches are ch 4. Inside arches are ch 5.
When I first made this, I used ch 3 for the edge arches, and the sides puckered. Ch 6 made them droop. Ch 4 was the sweet spot.
Trunk
Hold the tree with Row 11 along the bottom edge. Skip the first 12 sts from the right. Join Color B with a sl st in the 13th st.
- Row 1: Ch 1, sc in same st and in the next 5 sts. (6 sc) Turn.
- Rows 2–5: Ch 1, sc across. (6 sc) Turn after each row.
FO and weave in all ends.
Finishing: Where the Magic Happens
This is the step that fixed my floppy-lampshade problem.
- Stiffen it. Soak the tree in fabric stiffener (or the glue and water mix) and squeeze out the excess in a towel.
- Pin it flat. Lay it on foam board and pin out every fan so the scallops spread. Pin the hanging loop upright. Pinning the arches open is what gives you those clean, rounded tiers.
- Let it dry for 24 hours. I know it’s tempting to peek. Wait anyway.
Adding Beads and Bow
Sew the 4 mm pearls only after the tree is fully dry, since glue clogs beads. Sew one pearl onto each center sc anchor in the arch rows, skipping the edge sts. That’s 1 bead on Row 2, 2 on Row 4, 3 on Row 6, 4 on Row 8, and 5 on Row 10, so 15 beads total. Tie off neatly at the back.
Tie the ribbon into a small bow, stitch it just under the hanging loop, and sew the 6 mm pearl at the center of the knot.
A Few Ways to Switch It Up

Burgundy and gold: Deep wine red with gold beads and an ivory ribbon looks rich and a little vintage.
Frosted white: Cream yarn, silver beads, and a pale blue ribbon give you a snow-covered tree.
Ombré tiers: Change colors at the start of Rows 5 and 9, for example sage, then soft mint, then ivory. Because every tier is its own fan row, the color changes look intentional.
Extra sparkle: Hold one strand of fine gold metallic thread together with your yarn through the whole pattern. It’s subtle in daylight and pretty on the tree.
Gift topper size: Use DK cotton and a 3.0 mm hook for a larger tree, around 7 in tall, that works as a gift tag or a mantel decoration.
If you make one of these, please send me a photo. Everyone’s version turns out slightly different, and I love seeing the color combos. Share it in the comments or tag me when you post it. Happy hooking!