I’ve lost count of how many crochet flowers I’ve made, and nearly all of them had the same problem. The petals flopped outward, the center went wonky, and the whole thing looked more like a pancake than a flower. So when I wanted a small red-and-white flower I could use as a coaster, a bag charm, or a little gift topper, I made myself a rule. The petals had to stand up, the colors had to stay crisp, and I wasn’t allowed to need anything fancier than a single crochet and a double crochet.

This is where I landed: a red center, a bright white ring, and ten round red petals around the edge. It works up in about 30 minutes once you know the rhythm. And because the petals are built on a firm red base round, they stay put instead of curling away from the white.
Finished Size
- Diameter: approximately 3.5 in / 9 cm (petal tip to petal tip)
- Center + white ring only: approximately 2.25 in / 5.5 cm
Skill Level
Beginner. If you can make a magic ring, single crochet, increase, double crochet, and slip stitch, you can finish this. The only slightly “new” skill is changing colors, and I walk you through it below.
Materials
Yarn (DK / light worsted cotton):
- Color A (Cherry Red): about 20 yd / 18 m
- Color B (Bright White): about 12 yd / 11 m
Hook: 3.0 mm (US D-3)
Notions:
- Yarn needle
- 1 stitch marker
- Small sharp scissors
- Optional: pin-back for a brooch, or a ribbon loop for hanging
A note on yarn: I strongly recommend 100% mercerized cotton. It’s crisp, it holds the petal shape, and it handles being a coaster. Acrylic works for decoration only. Whatever you buy, dunk a short red strand in warm water and press it on a white paper towel. Cheap reds can bleed onto the white, and you really don’t want to find that out after finishing.
Gauge
Single crochet in the round: 6 sts = 1 in / 2.5 cm. Gauge isn’t critical here, but your fabric should be dense. If you can see gaps between the white stitches, go down a hook size. A coaster with holes in it defeats the purpose.
Abbreviations
- ch: chain
- sc: single crochet
- dc: double crochet
- inc: increase (2 sc in the same stitch)
- MR: magic ring
- sl st: slip stitch
- st(s): stitch(es)
- FO: fasten off
Rounds 1–4 are worked in a continuous spiral (no joining). Rounds 5 and 6 are joined with a slip stitch.
The Red Center
With Color A (red):
- Rnd 1: 10 sc in MR (10)
- Rnd 2: inc around (20)
Tighten the magic ring firmly. A loose center makes the whole flower sag later.
The White Ring
Changing color: On the last sc of Round 2, work the final yarn-over with white instead of red. Pull white through to finish that stitch, then carry on in white. This way the red stays clean and there’s no little knot on the right side. Leave the red tail hanging at the back; you’ll weave it in at the end.
With Color B (white):
- Rnd 3: (sc 1, inc) x10 (30)
- Rnd 4: (sc 2, inc) x10 (40)
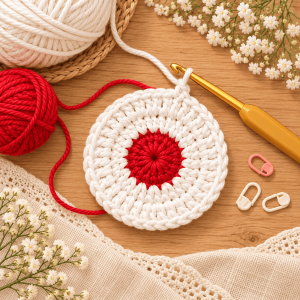
Join with a sl st into the next stitch. FO white and weave the tail in now. Trust me, weaving in white before you start the red petals saves you a lot of fiddling.
The Red Base Round
Rejoin Color A (red) in any stitch with a sl st.
- Rnd 5: ch 1 (does not count as a st), sc in each st around (40). Join with a sl st in the first sc.
Why bother with a separate base round? Because it gives the petals a solid red line to grow from, and it hides the color change from white to red. Skip it and the petals sit directly on the white and look scruffy.
The Petals
Still with Color A, do not turn.
- Rnd 6: Sc in next st, 5 dc in next st, sc in next st, sl st in next st. Repeat from * 10 times total (10 petals).
Join to the first stitch with a sl st and FO, leaving a 6 in tail.
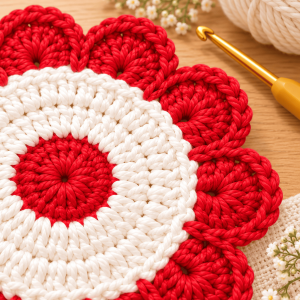
How to read it: each petal uses 4 stitches of the base round. The sc anchors the petal, the 5 dc make the rounded top, the second sc closes it, and the sl st is the little “valley” between petals. Count four stitches, work the sequence, and move on to the next four. If you get to the end and have a half petal left over, you’ve miscounted somewhere. Rip back to the start of the round. It only takes a minute and it’s much better than living with it.
Finishing
- Weave in all ends along the back of the stitches, going in two directions so nothing works loose.
- Lay the flower face down on a towel. Hold a steam iron about an inch above it, without touching the yarn. Let the steam relax the fabric for 10 seconds, then gently press the petals into shape with your fingertips.
- Let it dry flat. A coaster that’s been steamed once lies noticeably flatter than one that hasn’t.
What I Learned Making This
Count your petals before you start. On my very first attempt I lost one stitch somewhere in Round 4 and ended up with a lopsided flower. Now I put a stitch marker at every tenth stitch of the base round and check that the count is 40 before I touch a dc.
Mind the tension on the 5 dc. Fan stitches love to pull tight. If your petals look pinched, loosen your grip on the dc and let the loops stay a little taller. Pinched petals curl inward, loose ones lie flat, and what you’re after is in between.
Check the back of your color change. The white-to-red join is the only place this project can look messy. If you see a tiny gap, tug the tails gently, then close it with the yarn needle. It takes ten seconds.
Cotton shrinks a little the first time it gets wet. If you plan to use these as actual coasters, wash and dry one before you make a set of four, so you know what size they’ll settle at.
Ways to Switch It Up
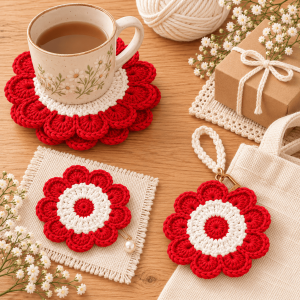
Make it a brooch. Sew a pin-back onto the back of the white ring, not the center. The ring has more stitches to hold it in place.
Bag charm or ornament. Chain 15 with red yarn, fold into a loop, and sew it behind one petal. It looks sweet hanging on a Christmas tree.
Different colors? Swap red for pink and white for cream for a softer look. The stitch counts stay exactly the same.
Want a bigger coaster? Keep the pattern but use worsted weight yarn and a 4.0 mm hook. You’ll get a flower about 4.5 in / 11.5 cm wide without changing a single stitch count.
Want a set? Make four, and stitch them onto a plain linen table runner for a Valentine’s or Christmas table.
If you make this flower, I’d love to see it. Share a photo in the comments, or tag me if you post it online. Happy hooking!